The Nature of Gridshell Form Finding

Grids, shells, and how they, in conjunction with the study of the natural world, can help us develop increasingly complex structural geometry.

Foreword

This post is the third installment of sort of trilogy, after Shapes, Fractals, Time & the Dimensions they Belong to, and Developing Space-Filling Fractals. While it’s not important to have read either of those posts to follow this one, I do think it adds a certain level of depth and continuity.

Regarding my previous entries, it can be difficult to see how any of this has to do with architecture. In fact I know a few people who think studying fractals is pointless.

Admittedly I often struggle to explain to people what fractals are, let alone how they can influence the way buildings look. However, I believe that this post really sheds light on how these kinds of studies may directly influence and enhance our understanding (and perhaps even the future) of our built environment.

On a separate note, I heard that a member of the architectural academia said “forget biomimicry, it doesn’t work.”

Firstly, I’m pretty sure Frei Otto would be rolling over in his grave.

Secondly, if someone thinks that biomimicry is useless, it’s because they don’t really understand what biomimicry is. And I think the same can be said regarding the study of fractals. They are closely related fields of study, and I wholeheartedly believe they are fertile grounds for architectural marvels to come.

7.0 Introduction to Shells

As far as classification goes, shells generally fall under the category of two-dimensional shapes. They are defined by a curved surface, where the material is thin in the direction perpendicular to the surface. However, assigning a dimension to certain shells can be tricky, since it kinda depends on how zoomed in you are.

A strainer is a good example of this – a two-dimensional gridshell. But if you zoom in, it is comprised of a series of woven, one-dimensional wires. And if you zoom in even further, you see that each wire is of course comprised of a certain volume of metal.

This is a property shared with many fractals, where their dimension can appear different depending on the level of magnification. And while there’s an infinite variety of possible shells, they are (for the most part) categorizable.

7.1 – Single Curved Surfaces

Analytic geometry is created in relation to Cartesian planes, using mathematical equations and a coordinate systems. Synthetic geometry is essentially free-form geometry (that isn’t defined by coordinates or equations), with the use of a variety of curves called splines. The following shapes were created via Synthetic geometry, where we’re calling our splines ‘u’ and ‘v.’

A-Barrel-Vault
Uniclastic: Barrel Vault (Cylindrical paraboloid)

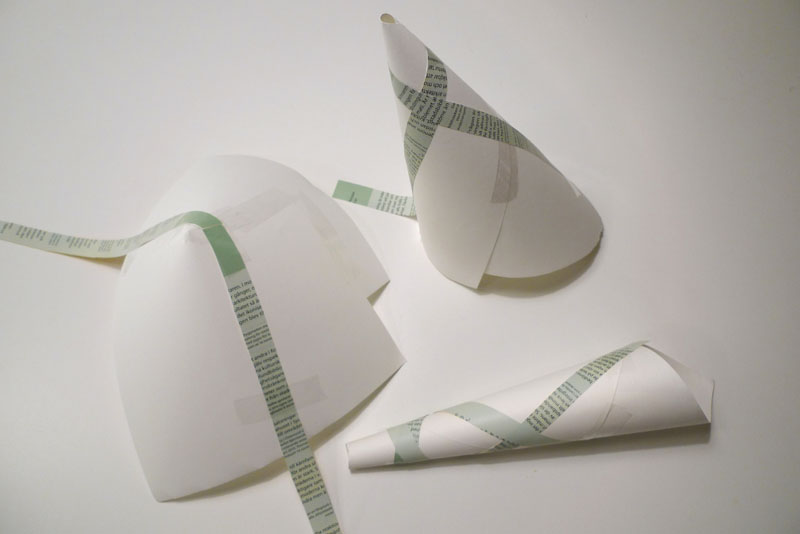
These curves highlight each dimension of the two-dimensional surface. In this case only one of the two ‘curves’ is actually curved, making this shape developable. This means that if, for example, it was made of paper, you could flatten it completely.

B-Conoid

Uniclastic: Conoid (Conical paraboloid)

In this case, one of them grows in length, but the other still remains straight. Since one of the dimensions remains straight, it’s still a single curved surface – capable of being flattened without changing the area. Singly curved surfaced may also be referred to as uniclastic or monoclastic.

7.2 – Double Curved Surfaces

These can be classified as synclastic or anticlastic, and are non-developable surfaces. If made of paper, you could not flatten them without tearing, folding or crumpling them.

C-Dome.gif
Synclastic: Dome (Elliptic paraboloid)

In this case, both curves happen to be identical, but what’s important is that both dimensions are curving in the same direction. In this orientation, the dome is also under compression everywhere.

The surface of the earth is double curved, synclastic – non-developable. “The surface of a sphere cannot be represented on a plane without distortion,” a topic explored by Michael Stevens: https://www.youtube.com/watch?v=2lR7s1Y6Zig

D-Saddle.gif
Anticlastic: Saddle (Hyperbolic paraboloid)
This one was formed by non-uniformly sweeping a convex parabola along a concave parabola. It’s internal structure will behave differently, depending on the curvature of the shell relative to the shape. Roof shells have compressive stresses along the convex curvature, and tensile stress along the concave curvature.
Pringle
Kellogg’s potato and wheat-based stackable snack
Here is an example of a beautiful marriage of tensile and compressive potato and wheat-based anticlastic forces. Although I hear that Pringle cans are diabolically heinous to recycle, so they are the enemy.
11 Tensile and Compressive behaviour of shells.jpg
Structural Behaviour of Basic Shells [Source: IL 10 – Institute for Lightweight Structures and Conceptual Design]

7.3 – Translation vs Revolution

In terms of synthetic geometry, there’s more than one approach to generating anticlastic curvature:
E-Hyperbolic-Paraboloid-Saddle.gif
Hyperbolic Paraboloid: Straight line sweep variation

This shape was achieved by sweeping a straight line over a straight path at one end, and another straight path at the other. This will work as long as both rails are not parallel. Although I find this shape perplexing; it’s double curvature that you can create with straight lines, yet non-developable, and I can’t explain it..

F-Hyperbolic-Paraboloid-Tower.gif
Ruled Surface & Surface of Revolution (Circular Hyperboloid)
The ruled surface was created by sliding a plane curve (a straight line) along another plane curve (a circle), while keeping the angle between them constant. The surfaces of revolution was simply made by revolving a plane curve around an axis. (Surface of translation also exist, and are similar to ruled surfaces, only the orientation of the curves is kept constant instead of the angle.)
 
Cylinder_-_hyperboloid_-_cone.gif
Hyperboloid Generation [Source:Wikipedia]

The hyperboloid has been a popular design choice for (especially nuclear cooling) towers. It has excellent tensile and compressive properties, and can be built with straight members. This makes it relatively cheap and easy to fabricate relative to it’s size and performance.

These towers are pretty cool acoustically as well: https://youtu.be/GXpItQpOISU?t=40s


8.0 Geodesic Curves

These are singly curved curves, although that does sound confusing. A simple way to understand what geodesic curves are, is to give them a width. As previously explored, we know that curves can inhabit, and fill, two-dimensional space. However, you can’t really observe the twists and turns of a shape that has no thickness.

Geodesic Curves - Ribon.jpg
Conic Plank Lines (Source: The Geometry of Bending)

A ribbon is essentially a straight line with thickness, and when used to follow the curvature of a surface (as seen above), the result is a plank line. The term ‘plank line’ can be defined as a line with an given width (like a plank of wood) that passes over a surface and does not curve in the tangential plane, and whose width is always tangential to the surface.

Since one-dimensional curves do have an orientation in digital modeling, geodesic curves can be described as the one-dimensional counterpart to plank lines, and can benefit from the same definition.

The University of Southern California published a paper exploring the topic further: http://papers.cumincad.org/data/works/att/f197.content.pdf

8.1 – Basic Grid Setup

For simplicity, here’s a basic grid set up on a flat plane:

G-Geocurves.gif
Basic geodesic curves on a plane

We start by defining two points anywhere along the edge of the surface. Then we find the geodesic curve that joins the pair. Of course it’s trivial in this case, since we’re dealing with a flat surface, but bear with me.

H-Geocurves.gif
Initial set of curves

We can keep adding pairs of points along the edge. In this case they’re kept evenly spaced and uncrossing for the sake of a cleaner grid.

I-Geocurves.gif
Addition of secondary set of curves

After that, it’s simply a matter of playing with density, as well as adding an additional set of antagonistic curves. For practicality, each set share the same set of base points.

J-Geocurves.gif
Grid with independent sets

He’s an example of a grid where each set has their own set of anchors. While this does show the flexibility of a grid, I think it’s far more advantageous for them to share the same base points.

8.2 – Basic Gridshells

The same principle is then applied to a series of surfaces with varied types of curvature.

K-Barrel
Uniclastic: Barrel Vault Geodesic Gridshell

First comes the shell (a barrel vault in this case), then comes the grid. The symmetrical nature of this surface translates to a pretty regular (and also symmetrical) gridshell. The use of geodesic curves means that these gridshells can be fabricated using completely straight material, that only necessitate single curvature.

L-Conoid
Uniclastic: Conoid Geodesic Gridshell

The same grid used on a conical surface starts to reveal gradual shifts in the geometry’s spacing. The curves always search for the path of least resistance in terms of bending.

M-Dome
Synclastic: Dome Geodesic Gridshell

This case illustrates the nature of geodesic curves quite well. The dome was free-formed with a relatively high degree of curvature. A small change in the location of each anchor point translates to a large change in curvature between them. Each curve looks for the shortest path between each pair (without leaving the surface), but only has access to single curvature.

N-Saddle
Anticlastic: Saddle Geodesic Gridshell

Structurally speaking, things get much more interesting with anticlastic curvature. As previously stated, each member will behave differently based on their relative curvature and orientation in relation to the surface. Depending on their location on a gridshell, plank lines can act partly in compression and partly in tension.

On another note:

While geodesic curves make it far more practical to fabricate shells, they are not a strict requirement. Using non-geodesic curves just means more time, money, and effort must go into the fabrication of each component. Furthermore, there’s no reason why you can’t use alternate grid patterns. In fact, you could use any pattern under the sun – any motif your heart desires (even tessellated puppies.)

6 - Alternate Grid
Alternate Gridshell Patterns [Source: IL 10 – Institute for Lightweight Structures and Conceptual Design]

Here are just a few of the endless possible pattern. They all have their advantages and disadvantages in terms of fabrication, as well as structural potential.

Biosphere Environment Museum - Canada
Biosphere Environment Museum – Canada

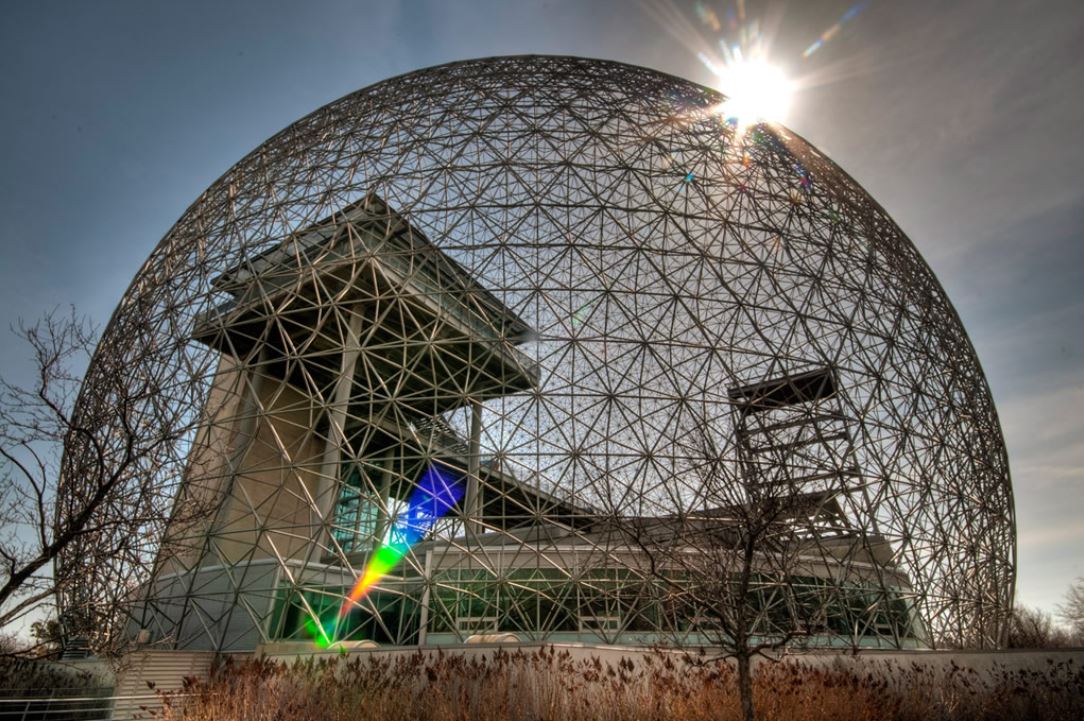
Gridshells with large amounts of triangulation, such as Buckminster Fuller’s geodesic spheres, typically perform incredibly well structurally. These structure are also highly efficient to manufacture, as their geometry is extremely repetitive.  

Centre Pompidou-Metz - France
Centre Pompidou-Metz – France

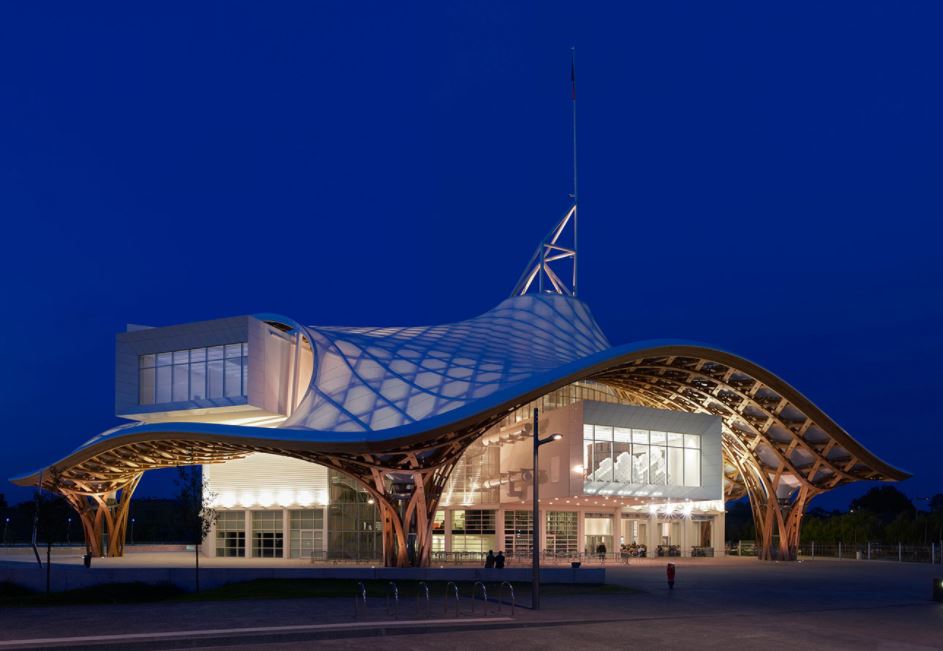
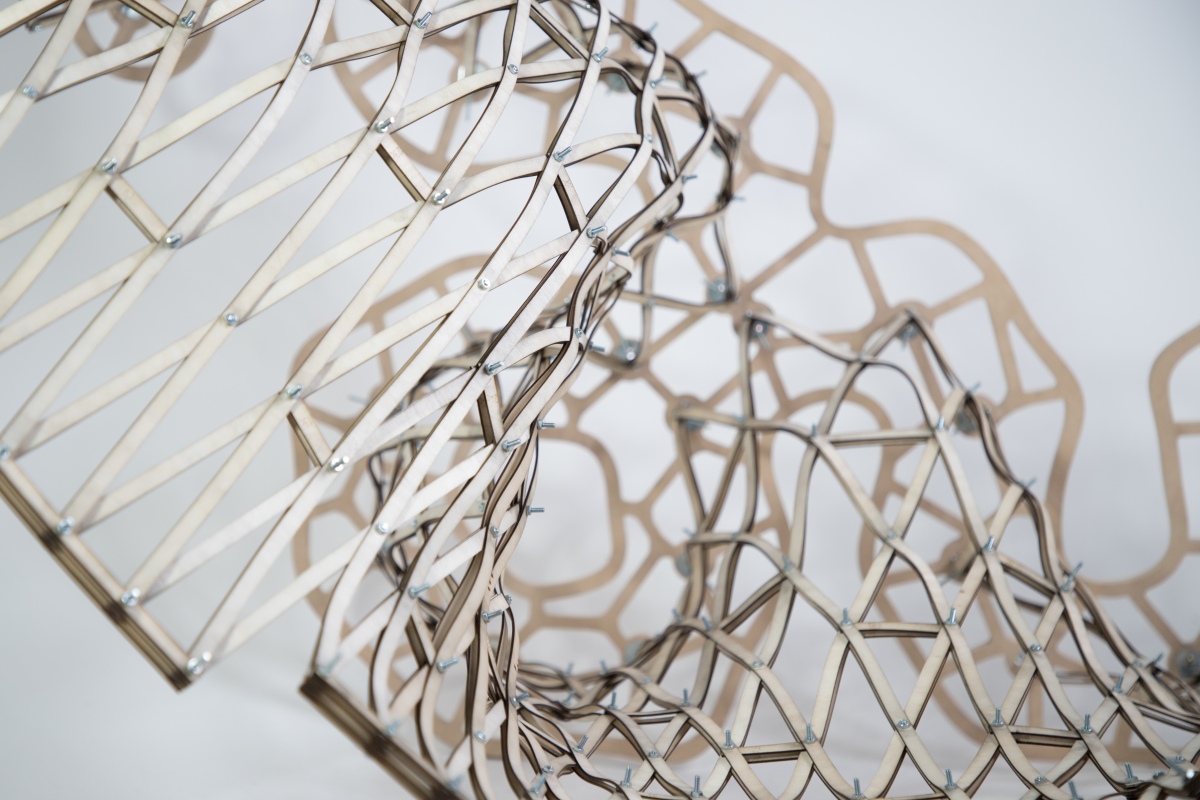
Gridshells with highly irregular geometry are far more challenging to fabricate. In this case, each and every piece had to be custom made to shape; I imagine it must have costed a lot of money, and been a logistical nightmare. Although it is an exceptionally stunning piece of architecture (and a magnificent feat of engineering.)

8.3 – Gridshell Construction

In our case, building these shells is simply a matter of converting the geodesic curves into planks lines.

O - Saddle 2
Hyperbolic Paraboloid: Straight Line Sweep Variation With Rotating Plank Line Grid

The whole point of using them in the first place is so that we can make them out of straight material that don’t necessitate double curvature. This example is rotating so the shape is easier to understand. It’s grid is also rotating to demonstrate the ease at which you can play with the geometry.

Hyperbolic-Paraboloid-Plank-Lines
Hyperbolic Paraboloid: Flattened Plank Lines With Junctions

This is what you get by taking those plank lines and laying them flat. In this case both sets are the same because the shell happens to the identicall when flipped. Being able to use straight material means far less labour and waste, which translates to faster, and or cheaper, fabrication.

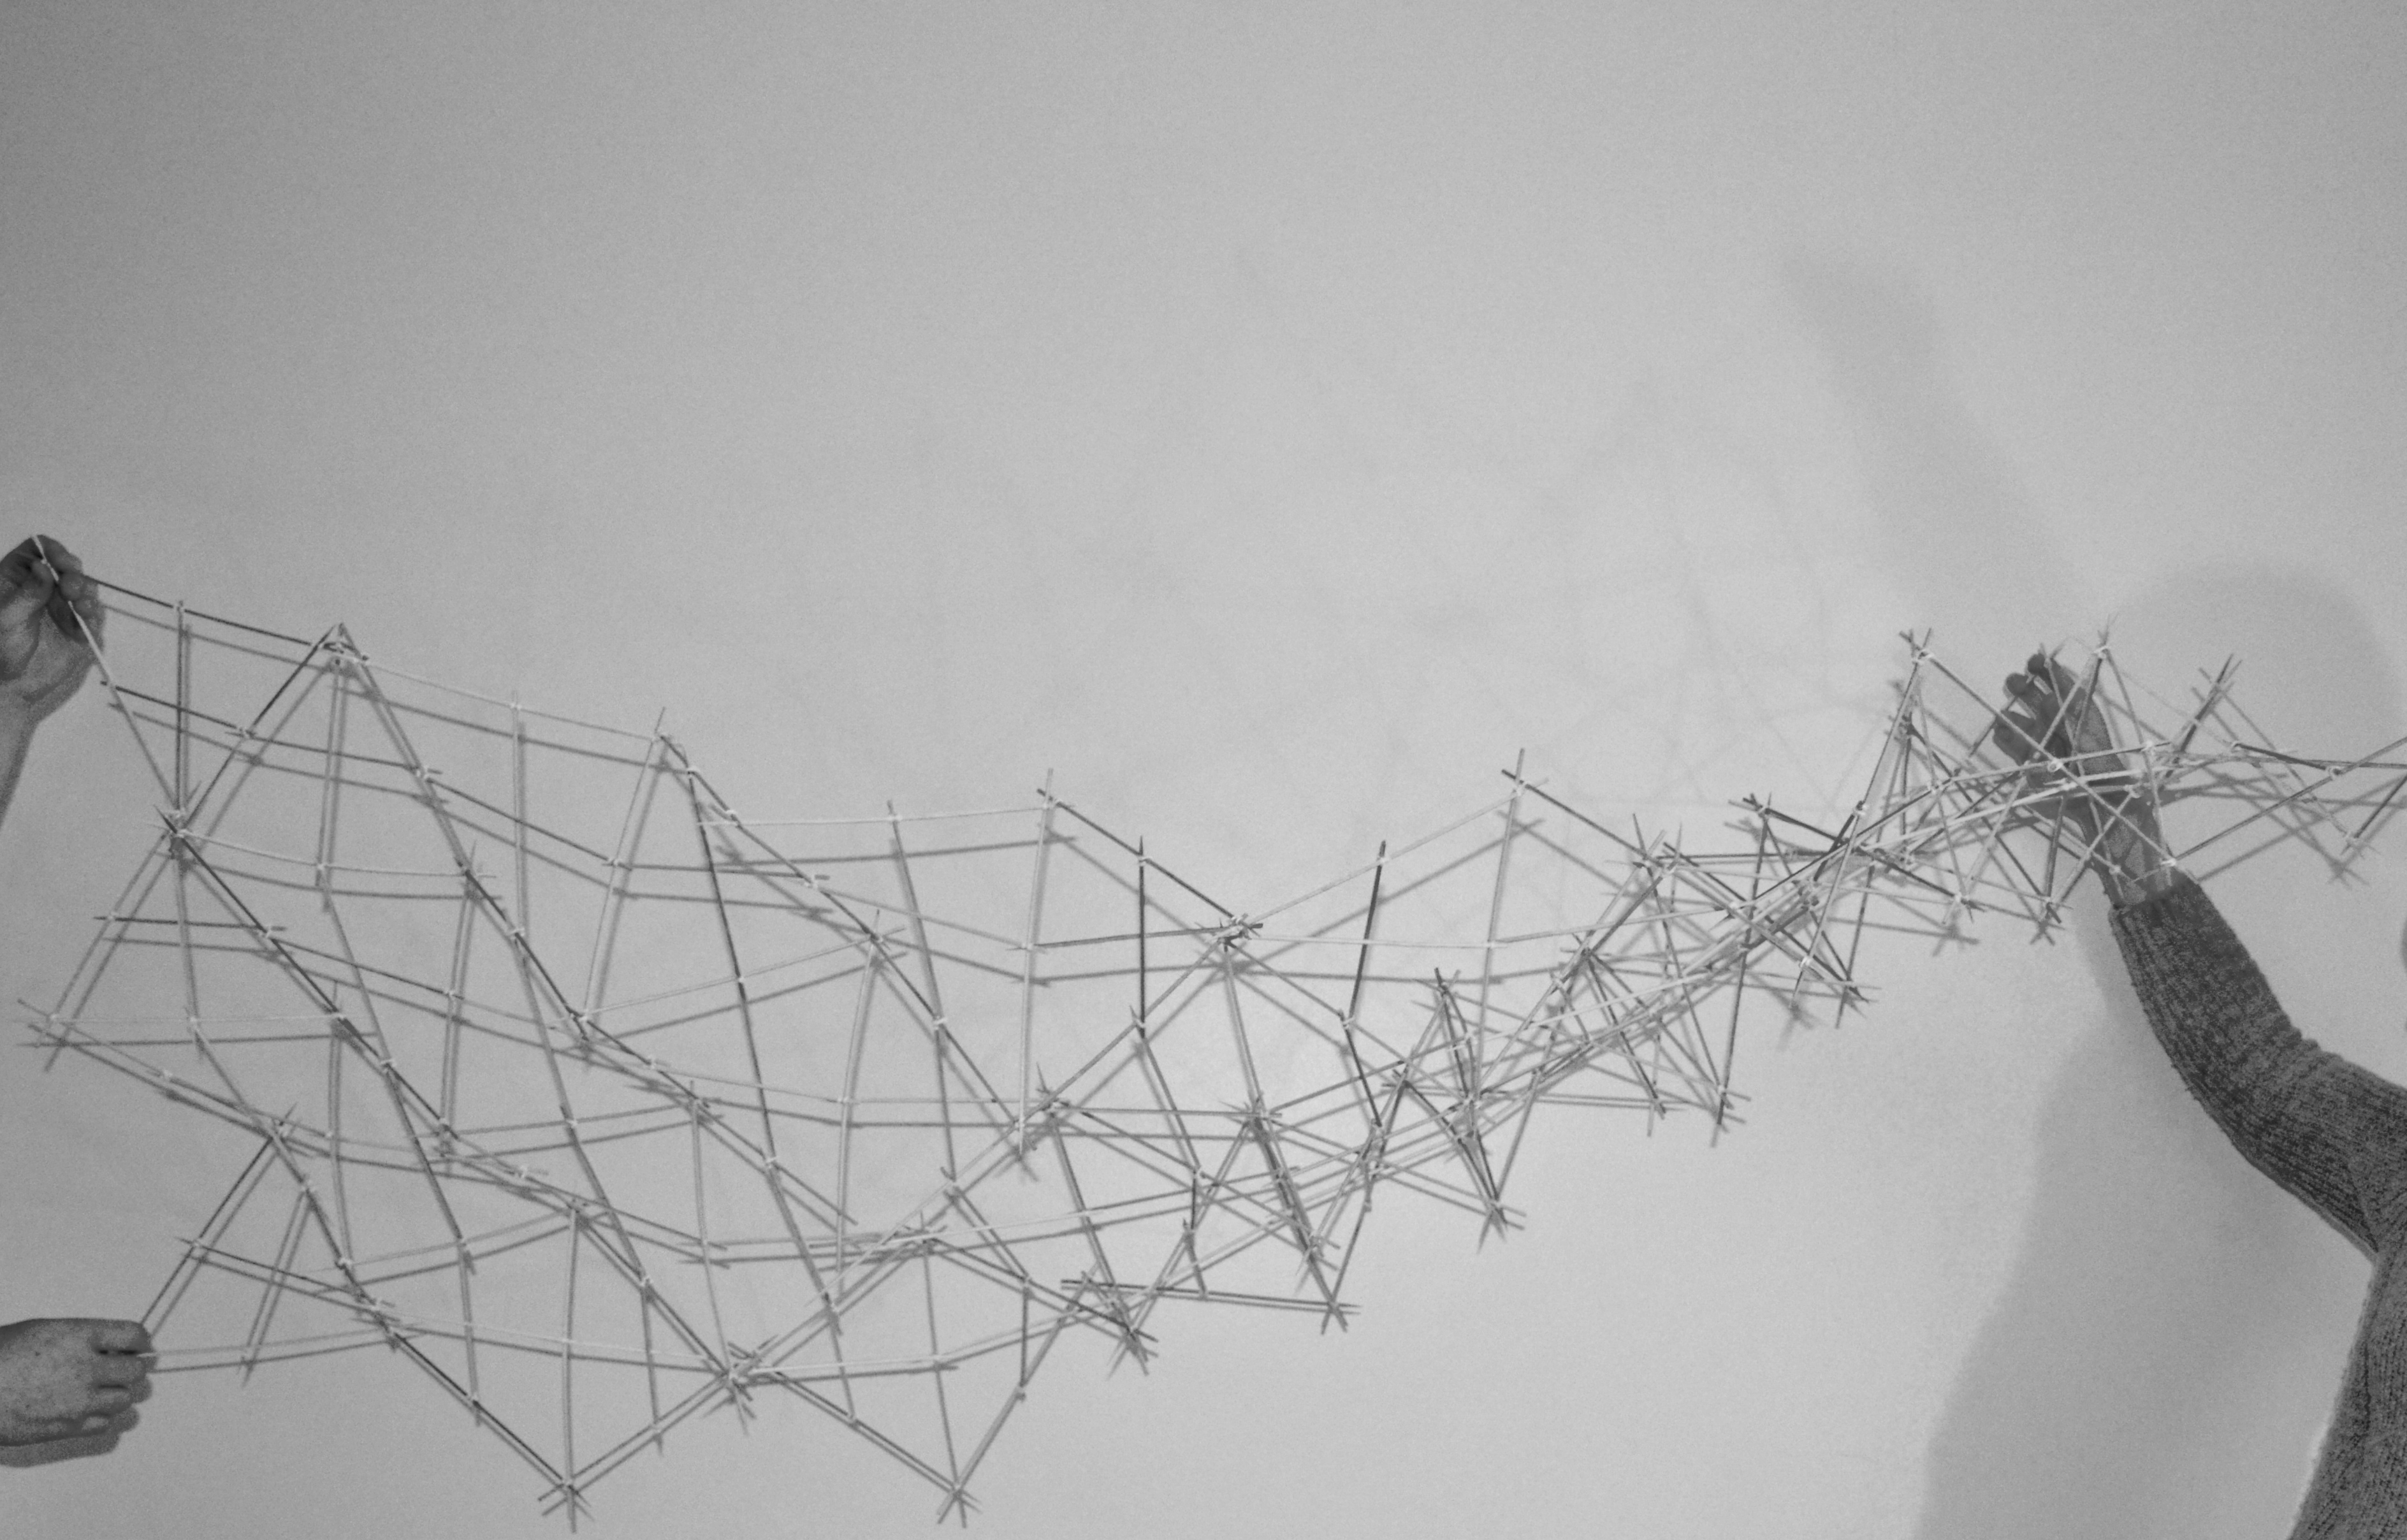
An especially crucial aspect of gridshells is the bracing. Without support in the form of tension ties, cable ties, ring beams, anchors etc., many of these shells can lay flat. This in and of itself is pretty interesting and does lends itself to unique construction challenges and opportunities. This isn’t always the case though, since sometimes it’s the geometry of the joints holding the shape together (like the geodesic spheres.) Sometimes the member are pre-bent (like Pompidou-Metz.) Although pre-bending the timber kinda strikes me as cheating thought.. As if it’s not a genuine, bona fide gridshell.

Toledo-gridshell-20-Construction-process
Toledo Gridshell 2.0. Construction Process [source: Timber gridshells – Numerical simulation, design and construction of a full scale structure]

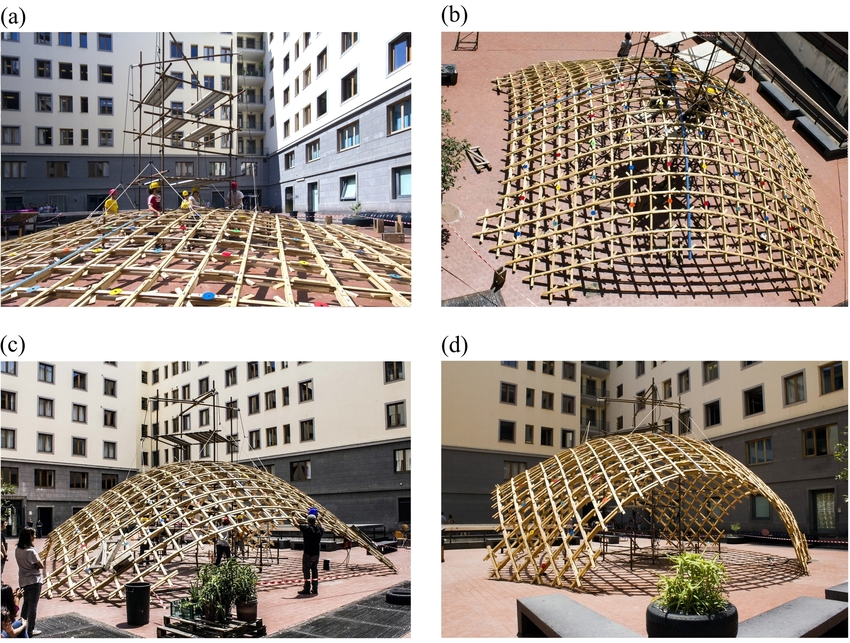
This is one of the original build method, where the gridshell is assembled flat, lifted into shape, then locked into place.

9.0 Form Finding

Having studied the basics makes exploring increasingly elaborate geometry more intuitive. In principal, most of the shells we’ve looked are known to perform well structurally, but there are strategies we can use to focus specifically on performance optimization.

9.0 – Minimal Surfaces

These are surfaces that are locally area-minimizing – surfaces that have the smallest possible area for a defined boundary. They necessarily have zero mean curvature, i.e. the sum of the principal curvatures at each point is zero. Soap bubbles are a great example of this phenomenon.

hyperbolic paraboloid soap bubble

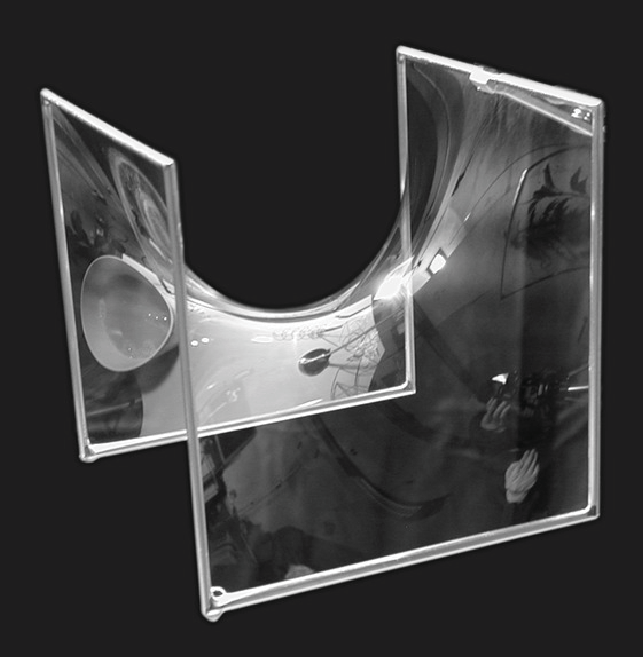
Hyperbolic Paraboloid Soap Bubble [Source: Serfio Musmeci’s “Froms With No Name” and “Anti-Polyhedrons”]Soap film inherently forms shapes with the least amount of area needed to occupy space – that minimize the amount of material needed to create an enclosure. Surface tension has physical properties that naturally relax the surface’s curvature.

00---Minimal-Surface-Model
Kangaroo2 Physics: Surface Tension Simulation

We can simulate surface tension by using a network of curves derived from a given shape. Applying varies material properties to the mesh results in a shape that can behaves like stretchy fabric or soap. Reducing the rest length of each of these curves (while keeping the edges anchored) makes them pull on all of their neighbours, resulting in a locally minimal surface.

Here are a few more examples of minimal surfaces you can generate using different frames (although I’d like stress that the possibilities are extremely infinite.) The first and last iterations may or may not count, depending on which of the many definitions of minimal surfaces you use, since they deal with pressure. You can read about it in much greater detail here: https://tinyurl.com/ya4jfqb2

Eden_Project_geodesic_domes_panorama.jpg
The Eden Project – United Kingdom

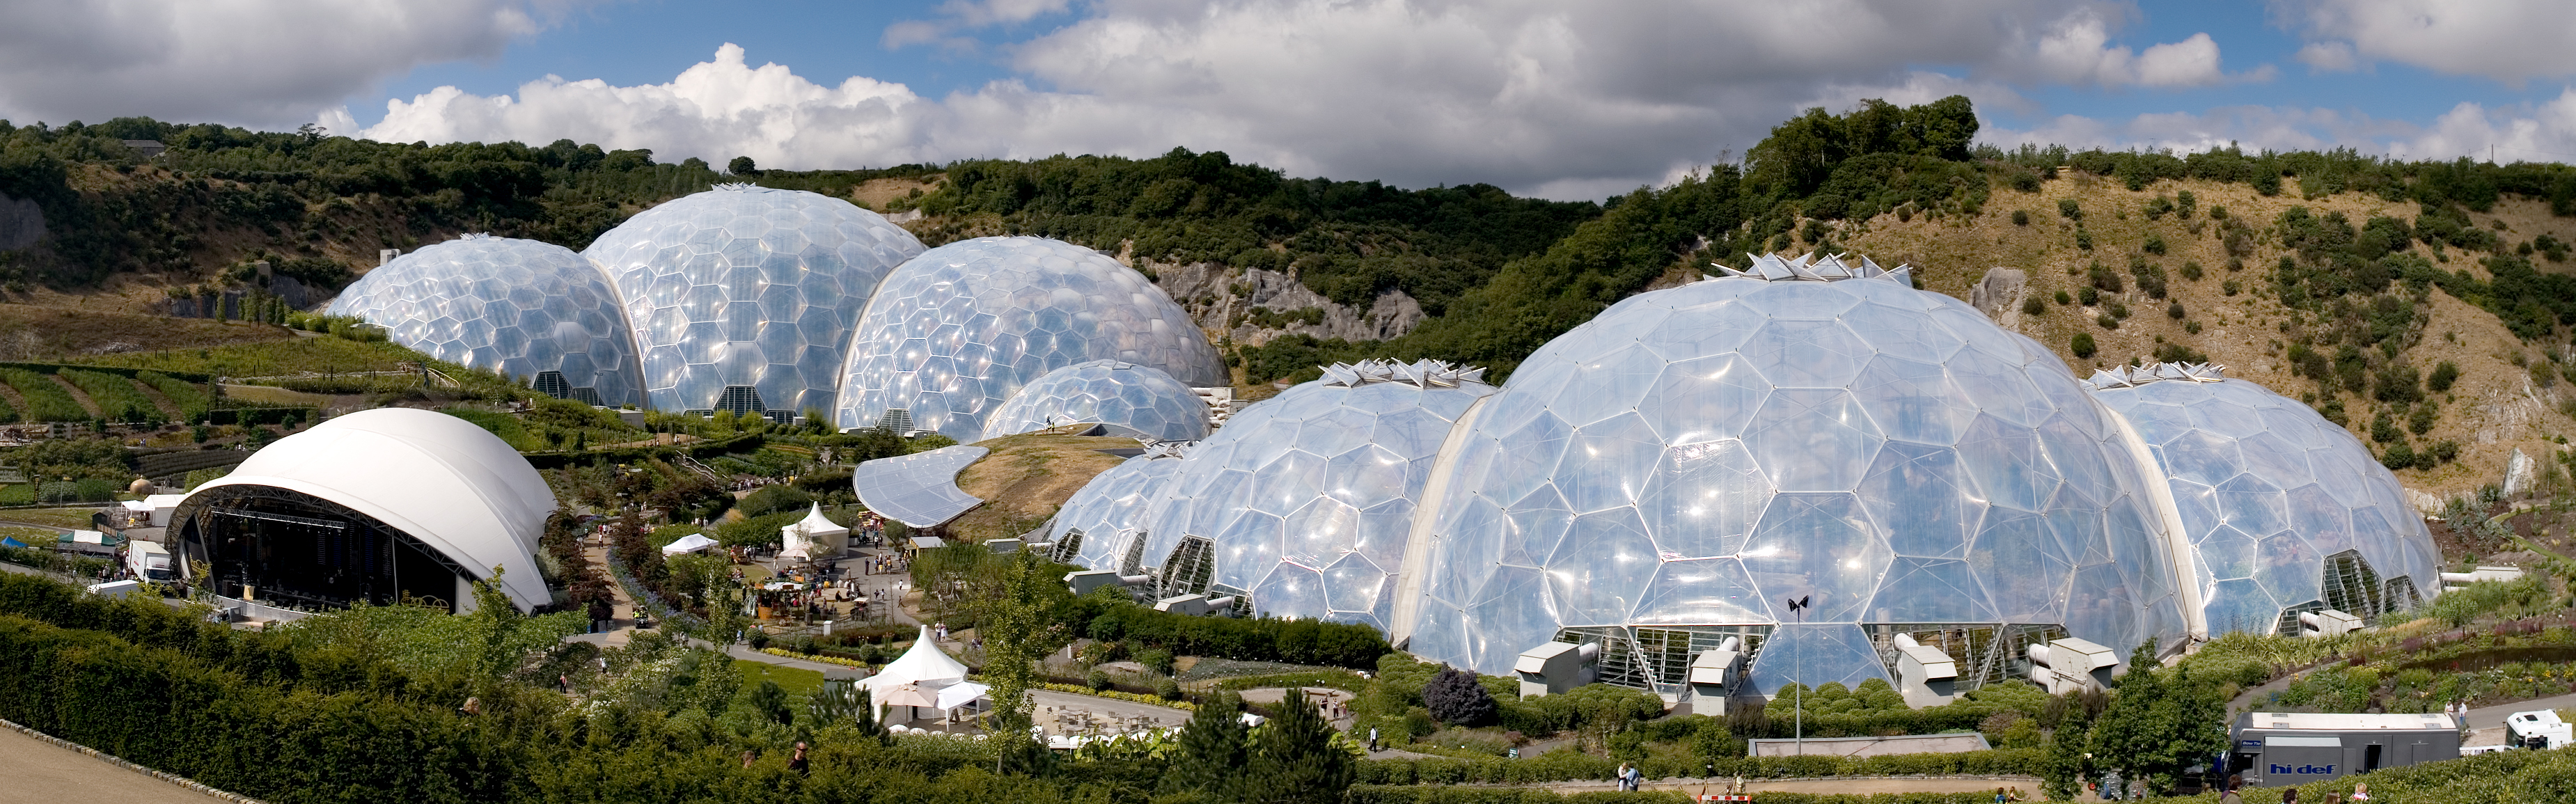
Here we have one of the most popular examples of minimal surface geometry in architecture. The shapes of these domes were derived from a series of studies using clustered soap bubbles. The result is a series of enormous shells built with an impressively small amount of material.

Triply periodic minimal surfaces are also a pretty cool thing (surfaces that have a crystalline structure – that tessellate in three dimensions):

Another powerful method of form finding has been to let gravity dictate the shapes of structures. In physics and geometry, catenary (derived from the Latin word for chain) curves are found by letting a chain, rope or cable, that has been anchored at both end, hang under its own weight. They look similar to parabolic curves, but perform differently.

00---Haning-Model
Kangaroo2 Physics: Catenary Model Simulation

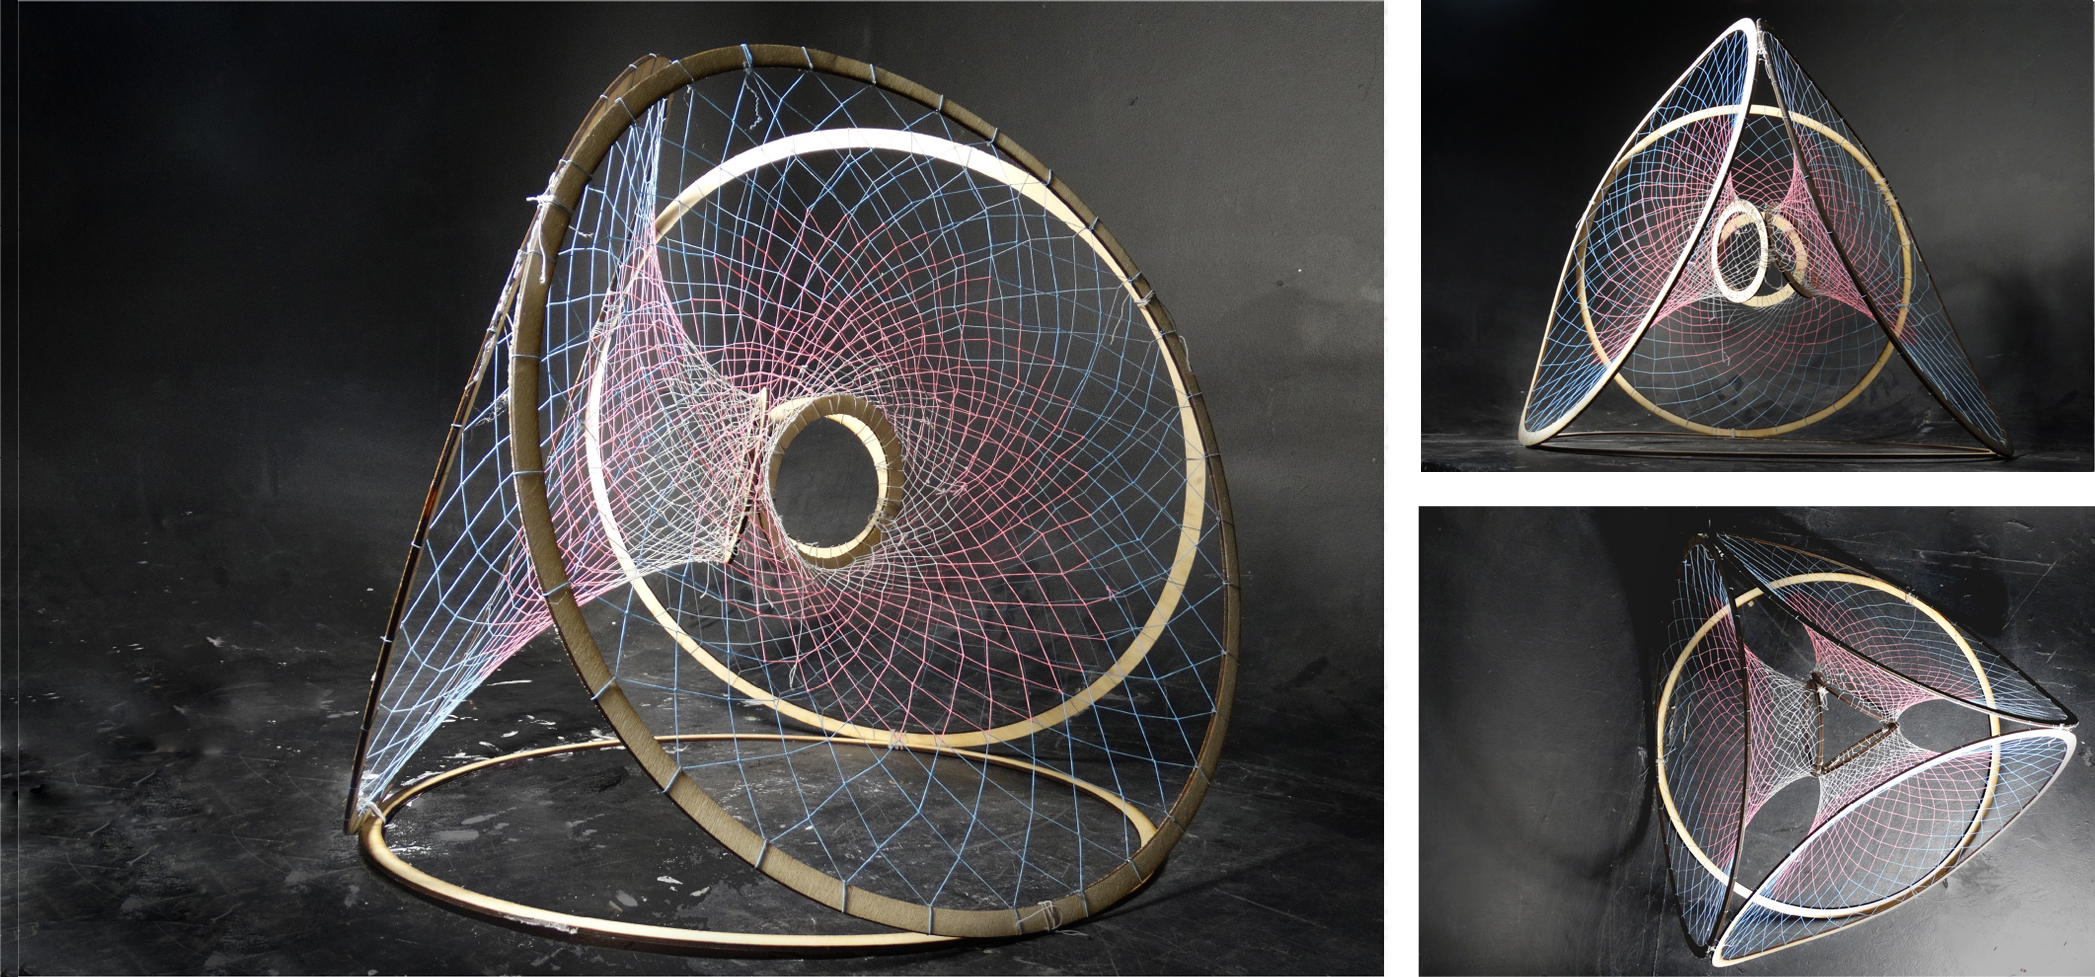
A net shown here in magenta has been anchored by the corners, then draped under simulated gravity. This creates a network of hanging curves that, when converted into a surface, and mirrored, ultimately forms a catenary shell. This geometry can be used to generate a gridshell that performs exceptionally well under compression, as long as the edges are reinforced and the corners are braced.

While I would be remiss to not mention Antoni Gaudí on the subject of catenary structure, his work doesn’t particularly fall under the category of gridshells. Instead I will proceed to gawk over some of the stunning work by Frei Otto.

Of course his work explored a great deal more than just catenary structures, but he is revered for his beautiful work on gridshells. He, along with the Institute for Lightweight Structures, have truly been pioneers on the front of theoretical structural engineering.

9.3 – Biomimicry in Architecture

There are a few different terms that refer to this practice, including biomimetics, bionomics or bionics. In principle they are all more or less the same thing; the practical application of discoveries derived from the study of the natural world (i.e. anything that was not caused or made by humans.) In a way, this is the fundamental essence of the scientific method: to learn by observation.
Biomimicry-Bird-Plane
Example of Biomimicry

Frei Otto is a fine example of ecological literacy at its finest. A profound curiosity of the natural world greatly informed his understanding of structural technology. This was all nourished by countless inquisitive and playful investigations into the realm of physics and biology. He even wrote a series of books on the way that the morphology of bird skulls and spiderwebs could be applied to architecture called Biology and Building. His ‘IL‘ series also highlights a deep admiration of the natural world.

Of course he’s the not the only architect renown their fascination of the universe and its secrets; Buckminster Fuller and Antoni Gaudí were also strong proponents of biomimicry, although they probably didn’t use the term (nor is the term important.)

Gaudí’s studies of nature translated into his use of ruled geometrical forms such as hyperbolic paraboloids, hyperboloids, helicoids etc. He suggested that there is no better structure than the trunk of a tree, or a human skeleton. Forms in biology tend to be both exceedingly practical and exceptionally beautiful, and Gaudí spent much of his life discovering how to adapt the language of nature to the structural forms of architecture.

Fractals were also an undisputed recurring theme in his work. This is especially apparent in his most renown piece of work, the Sagrada Familia. The varying complexity of geometry, as well as the particular richness of detail, at different scales is a property uniquely shared with fractal nature.

Antoni Gaudí and his legacy are unquestionably one of a kind, but I don’t think this is a coincidence. I believe the reality is that it is exceptionally difficult to peruse biomimicry, and especially fractal geometry, in a meaningful way in relation to architecture. For this reason there is an abundance of superficial appropriation of organic, and mathematical, structures without a fundamental understanding of their function. At its very worst, an architect’s approach comes down to: ‘I’ll say I got the structure from an animal. Everyone will buy one because of the romance of it.”

That being said, modern day engineers and architects continue to push this envelope, granted with varying levels of success. Although I believe that there is a certain level of inevitability when it comes to how architecture is influenced by natural forms. It has been said that, the more efficient structures and systems become, the more they resemble ones found in nature.

Euclid, the father of geometry, believed that nature itself was the physical manifestation of mathematical law. While this may seems like quite a striking statement, what is significant about it is the relationship between mathematics and the natural world. I like to think that this statement speaks less about the nature of the world and more about the nature of mathematics – that math is our way of expressing how the universe operates, or at least our attempt to do so. After all, Carl Sagan famously suggested that, in the event of extra terrestrial contact, we might use various universal principles and facts of mathematics and science to communicate.

The Bawaajige Nagwaagan


dream-catchers-research
Dream Catchers by Nick Huard

Legend of the Dream Catcher

‘The legend of a dream catcher began long time ago, when the child of a Woodland chief fell ill. Unsettled by fever, the child was plagued with bad dreams and unable to sleep. In an attempt to heal him, the tribe’s Medicine Woman created a device that would ‘catch’ these bad dreams. Forming a circle with a slender willow branch, she filled the centre with sinew, using a pattern borrowed from our brother the Spider, who weaves a web. This dream catcher was then hung over the bed of the child. Soon the fever broke, and the child slept peacefully.

It is said that at night, when dreams visit, they are caught in the dream catcher’s web, and only the good dreams are able to find their way to the dreamer, filtering down through the feather. When the warmth of the morning sun arrives, it burns away the bad dreams that have been caught. The good dreams, now knowing the path,visit again on other nights.’ (Oberholtzer, 2012, p9).


Origins

Dreamcatchers originated with the Ojibwe, a tribe of Native Americans scattered throughout the areas of the lake country in northern Michigan, Wisconsin, and Minnesota, and along the southern border of Canada, along the shores of Lakes Huron, Superior and Michigan, whose survival relied on fishing, hunting and trapping.  

Traditionally, the dream catchers were made by tying sinew strands onto a few inches in diameter round or tear-shaped frames of willow and were often wrapped in leather.

The spiritual life of the Ojibwa centred around the Midewiwin, the Grand Medicine Society and focused on the individual spiritual growth, gaining the insight through their dreams or visions.


untitled-9
Grey Owl repairing an Ojibwa-style shoe

Mystical Experience

My project is a re-interpretation of the beliefs that dreams have magical qualities with the ability to change or direct one’s path in life. The bawaajige nagwaagan intends to create a mystical experience, where people are caught inside, similar to the way that bad dreams are caught in the dreamcatcher’s web, and good dreams escape through the centre. The participants are encouraged to climb through the centre and escape their bad dreams and feelings, releasing their spirit through the enclosure. Now they can sleep in the peaceful environment, stimulated by the fantasy of glowing feathers and luminescent rope structures. The pavilion aims for people to sleep, relax and free themselves from stress while being protected by the magical webs of the dream catcher.


final-render-night-green
The Bawaajige Nagwaagan at night

render-night-detail
Close-up render at night

Romantic essence of the Native American Culture

The proposal is a celebration of the romantic essence of the Native American Culture. The large scale, three dimensional net is inspired by the native methods and techniques of making dream catchers. It is a manifestation of the traditions and significance of the Native Americans, paying respect and pledging support to the indigenous people of America.

The structure situated in the Burning Man festival commemorates the ceremonies of Native Americans, dedicated to acquiring an insight through dreams and visions. Fasting, or giving up of certain necessities for a certain length of time was a common practice used to enhance one’s ability to access different dreams or visions. Another method was to pour water over hot rocks to produce steam, which enhanced the occurrence of dreams, used as source of introspection. These rituals relate to the festival’s assertion of disconnecting from the necessities of our contemporary world, supplemented by the extreme weather conditions, which are hoped to encourage reflection.

The pavilion responds and works together with the Black Rock desert’s environment, and adds to the wider cultural context of leaving behind the essentials and expectations of the contemporary world while creating a moment for contemplation and tranquility in the magical weaves of the dream catcher.


new-dream-catcher-final-day-render
The Bawaajige Nagwaagan during the day

Proposal Development_System

rotation-increments

untitled-2

dream-catcher-stages


1.Aleksandra Wojciak_90gsm_A1_Merylbone_west

Form Experimentation_Platonic Forms

Hexahedron

model-1
Development Model


hexahedron-diagrams
Diagrams explaining model assembly


Tetrahedron

tetra-models-copy2
1:10 Model


models-tetrahedron
Diagrams explaining model assembly


Physical Description

The structure will be composed out of three, seven meters in diameter, dream catchers, tilted to form a tetrahedron. Each dream catcher’s net will be made out of 275 meters, 18mm, synthetic hemp rope which will be entwined in 1320 meters of 3mm fluorescent cord. Attached to the frame uv lights will make the fluorescent rope glow at night. Three rings hold the net structure together, with the bottom ring anchored to the ground, made out of T-shape plywood frames. The web of the frame will be 4 layers of 15mm ‘banana’ shaped pieces which will create a circle, together with 4 layers of 230mm x 2400mm x 9mm flange pieces bent in shape of the banana edge. Smaller rings, supporting the centre of the dreamcatcher net will be of similar structure, with 2 layers of banana pieces and 2 layers of 150mm x 2400m x 9mm flange pieces, bent in shape. The frame will be wrapped in 13500 meters of 8mm synthetic hemp with attached fluorescent fabric feathers.


axo_b_nagwagan
Axonometric View-Construction Development


assembly 1
Frame’s web assembly

assmbly 2
Frame’s flange assembly


assembly 3
Initial assembly diagrams

thebn_uv-lighting

UV lighting-Construction Development

Testing Ideas in 1:1 Scale


1-1-model-photograph
1:1 Scale Test Model exploring the possibilities of glowing net structure and its connections.

Assembly of the net is inspired by a macrame knotting technique rather than weaving which means that the net could be made out of smaller 15 meters long pieces, rather than one 275 m coil of rope, making it easier to assemble and repair. Rope is anchored to the frame with thimbles and shackles, attached to the bolted staple on the plate. The rope is connected with simple S-shape stainless steel hooks. After testing the net I found that although these are easy to assemble, they can create some movement in a connection, therefore I am planning on exploring the idea of ferrules, which could be crimped in place.

1-1-model-1

ola-ds10-dream-portfolio-3
Photographs of 1:1 Scale Model


PNEU + PACK

All living organisms are composed of cells, and cells are fluid-filled spaces surrounded by an envelope of little material- cell membrane. Frei Otto described this kind of structure as pneus.

From first order,  peripheral conditions or the packing configuration spatially give rise to specific shapes we see on the second  and third order.

This applies to most biological instances.  On a larger scale, the formation of beehives is a translated example of the different orders of ‘pneu’.

Interested to see the impact of lattice configuration on the forms, I moved on to digital physics simulation with Kangaroo 2 (based on a script by David Stasiuk). The key parameters involved for each lattice configuration are:

Inflation pressure in spheres
Collision force between the spheres
Collision force of spheres and bounding box
Surface tension of spheres
Weight.


Physical exploration is also done to understand pneumatic behaviors and their parameters.

This followed by 3D pneumatic space packing. Spheres in different lattice configuration is inflated, and then taken apart to examine the deformation within. This process can be thought of as the growing process of seeds or pips in fruits such as pomegranates and citrus under hydrostatic pressure within its skin; and dissections of these fruits.

As the spheres take the peripheral conditions, the middles ones which are surrounded by spheres transformed into Rhombic dodecahedron, Trapezoid Rhombic dodecahedron and diamond respectively in Hex Grid, FCC Grid,  and Square Grid. The spheres at the boundary take the shape of the bounding box hence they are more fully inflated(there are more spaces in between spheres and bounding box for expansion).


Physical experimentation has been done on inflatables structures. The following shows some of the outcome on my own and during an Air workshop in conjunction with Playweek led by Will Mclean and Laylac Shahed.

To summarize, pneumatic structures are forms wholly or mainly stabalised by either
– Pressurised difference in gas. Eg. Air structure or aerated foam structures
– liquid/hydrostatic pressure. Eg. Plant cells
– Forces between materials in bulk. Eg. Beehive, Fruits seeds/pips

There is a distinct quality of unpredictability and playfulness that pneumatic structures could offer. The jiggly nature of inflatables, the unpredictability resulted from deformation by compression and its lightweightness are intriguing. I will call them as pneumatic behaviour. I will continually explore what pneumatic materials and assembly of them could offer spatially in Brief 02. Digital simulations proved to be helpful in expressing the dynamic behaviours of pneumatic structures too, which I intend to continue.

Adaptable Hypars


An exploration of the simplest Hyperbolic Paraboloidic ‘saddle’ form has lead to the development of a modular system that combines the principles of the hypar (Hyperbolic Paraboloid) and elastic potential energy.

A hyperbolic paraboloid is an infinite doubly ruled surface in three dimensions with hyperbolic and parabolic cross-sections. It can be parametrized using the following equations:

Mathematical:   z = x2 – yor  x = y z

Parametric:   x(u,v)=u   y(u,v)=v   z(u,v)=uv

The physical manifestation of the above equations can be achieved by constructing a square and forcing the surface area to minimalise by introducing cross bracing that has shorter lengths than the  square edges.

Hypar01Hypar02

A particular square hypar defined by b = n * √2 (b=boundary, n=initial geometry or ‘cross bracing’) thus constricting the four points to the corners of a cube leads to interesting tessellations in three dimensions.

Hypar03Hypar04

Using a simple elastic lashing system to construct a hypar module binds all intersections together whilst allowing rotational movement. The rotational movement at any given intersection is proportionally distributed to all others. This combined with the elasticity of the joints means that the module has elastic potential energy (spring-like properties) therefore an array of many modules can adopt the same elastic properties.

Hypar05Hypar06

The system can be scaled, shaped, locked and adapted to suit programmatic requirements.

DSC_0794

The Wind Anemones

140214 Burning Man Application S Images
Models of The Wind Anemones

The Wind Anemones are The Playa’s walking, floating sea creatures. While the seas animals survive and are transported by the waters currents – these wind animals live and move using the energy provided by air. They are living, interactive and mobile – huge, rolling, climbing frames.

The Anemones are lively creature, light and agile they moves ceaselessly, desperate to escape their tethers. The creatures are ethereal, elegant and imposing. During the day they want only to play with the other inhabitants of The Playa, encouraging them to climb and view them.

Although large, the anemones are lightweight and strong – their wide spanning arms signal to all who pass them while their rustling sails propel them ceaselessly. When night falls the Wind Anemones become more subdued – their gently glowing hands beckon to the burners and their arm-top lights echo the noises produced on The Playa. These animals are living beings, both climbing frames and beacons they long to inspire, interact with and inhabit The Playa.

140214 Burning Man Application S Images4
Daytime render of The Wind Anemones

140214 Burning Man Application Images5
Nightime render of The Wind Anemones

Physical Description:

The Wind Anemone’s are the sea creatures of The Playa. Instead of moving and feeding with the seas currents and tides The Wind Anemones are a constructed representation of desert creatures. In the vast, arid, wilderness they are the only being that can survive, powered only by the winds energy.

Structurally the Anemones are super-lightweight bamboo sculptures allowing them to dance and move in the deserts unforgiving climate whilst being safe for people to climb and interact with. Each Anemone has 48 identical bamboo arms each capped with a painted polystyrene hand, glowing LED bulb and sail.

The fabric sails are both the energy harvesting component of the creatures and a reflection of the silk road that the festival represents. The many repeated elements of each Anemone means that they are cheap to build and easy to assemble. The tough, light limbs are resilient extremities; both mast and arm. While the sails create movement and foot holds for climbing.

Each Anemone is tether securely to a post again reflecting the living nature of the creatures and ensuring that they never role too far from their home. These tethers are strung with LED lights to reflect the lights of the Anemone’s and to signal the location of each tether to ensure safety at night.

The LEDs on the Anemone’s arms and tethers will be programmed to react to the sounds of The Playa, making the Anemone’s both react with and reflect the activity occurring around them.

140214 Burning Man Application Images2
Construction of the Wind Anemone

140214 Burning Man Application Images3
Construction Axo of The Wind Anemone

MINIMAL STRUCTURAL SYSTEM

This model uses the process I have previously explored, of minimal path systems by Frei Otto, but attempts to take the concept a stage further to create a minimal structural system.

The thread lengths are given approximately a 12.5% over-length leaving them quite loose and messy when dry. The model is then dipped in a water and soap solution and hung upside down. The wet threads bunch together, as seen in previous experiments, but due to the increased over length they also dip downwards creating a domed form. When dry, the model can be coated with resin in order to cast the form. The model can then be turned over maintaining the rigid minimal structural system. This process generates a strangely appealing aesthetic.

Unit Trip to Stuttgart, Germany

Below is our schedule and some pictures from DS10’s Unit Trip to Stuttgart which took place from the 4th until the 7th November 2011:

-Thursday 3rd: Visit of the Institute for Computational Design (ICD) by Prof. Achim Menges and lecture on the institute by the latter and Sean Alhquist.

– Friday 4th: Visit to the Baubotanik Structures with Daniel Schonle. Visit to the Mercedes Benz Museum by UN Studio. Visit to the Institute for Lightweight Structure (ILEK) with Christian Bergman. Party at the School of Architecture at the University of Stuttgart.

-Saturday 5th: Sleep. Visit to the Porsche Museum by Delugan Meissl. Relax at the Shwaben Quellen Spa. More Party.

-Sunday 6th: Visit to the Platanenkubus by and with Ferdinand Ludwig.

Click on the Thumbnails for Larger Slideshow 

This slideshow requires JavaScript.

DrinkPeeDrinkPeeDrinkPee

The drinkpeedrinkpeedrinkpee  project by Submersible Design details a novel way to extract the Nitrogen from urine in order to create fertiliser for plants. The process also has the added bonus of not overfeeding the marine environment which is a direct result of flushing urine directly into the sewers.

Olympiapark München

These are photos from my trip to Munich Olympic Stadium, designed by Günter Behnisch and Frei Otto for the 1972 Olympic Games.

The trip included a walk up over the top of the lightweight cable-net roof structure of the main stadium.

The main drivers for the design of the event spaces were the desire to have a ‘green’ games, a compact games, and use the notion of transparency and light. The green element of the games is manifested in the fact that the stadium and other events spaces were set in a large expanse of newly created parkland [the site was previously an airfield related to the adjacent BMW factory]. The compact element came through in that the athletes were able to walk from their accommodation to all events except sailing.

The idea of transparency and light was born primarily out of two factors:

– A desire to have a set of venues that contrasted absolutely with the heavy monumental Nazi architecture of the 1936 Olympics

-The fact that the 1972 Olympics were the first to be broadcast using colour TV cameras, which took 8 seconds to adjust from shooting in sunlight to shooting in shade. The transparent roof of the stadium minimised the contrast between shaded and non-shaded areas, allowing continuous filming as the cameras panned around.

The structure itself is based on a cable net pulled into shape by cables attached to large hollow steel columns. These columns take so much compressive force that they have to rest on 35m deep concrete foundations. Protection from rain is the primary function of the roof over the stadium, and for this purpose it is covered in 4mm plexi-glass sheets.

As shown in the photos below, these are attached directly to the cable net grid by flexible neoprene connectors about 100mm long. The sheets are clamped along their edges to neoprene strips which create 100mm wide flexible movement joints connecting them to each other. The  plexi-glass sheets currently in use were put in during a refurbishment in 1994-99, and were taken up to the roof as 3m x 3m sheets which were then cut to size in-situ.

The thinness of the plexi-glass combined with the flexible movement joints allow the cladding to move as the structure moves with wind, snow and thermal expansion loading. The steel columns rest on rubber lined ball and socket joints, allowing them to move freely in every direction. The tops of the columns can move by up to around 1m with large snow loading. A demonstration of the flexible tensile nature of the roof came when we were told to jump up and down on the walkway running over it – the whole roof behaved like a trampoline, deflecting about 200-300mm vertically as we jumped.

The swimming pool is the only enclosed building that I photographed the interior of. Also on the site is the indoor arena. The interior space is defined by a tensile membrane that hangs about 1m below the cable net. The walls are made from curtain walling supported by exterior space-frames. The connection between the membrane roof and the curtain walling needs to be flexible enough to take up the movement of the cable net, and is provided by an ETFE cushion.


Bending Curves on Kangaroo

As part of an investigation into gridshells I posted in the Grasshopper forum to try and find a solution to a definition using the bend force component through the Kangaroo plug-in for Grasshopper.

My intention was to deform a grid into lathes using a bend force whilst maintaining the overall length of each lathe (or curve) as a representation of how gridshell are constructed on site, where they are raised or lowered into position from an originally flat grid, and deform or bend due to their own self weight.

Daniel Piker the creator of Kangaroo replied with a very useful script component that allows the user to easily find the correct inputs for a divided curve that is plugged into the bend component.

He also very kindly finished the definition for me.

The files including the C# script component can be found in the forum post here if you would also like to investigate the bend force.

http://www.grasshopper3d.com/forum/topics/kangaroo-bending-1 

Above: Video Capture showing the curves bending in Rhino with Kangaroo